
Before You Start #
- You must have the following enabled on your cluster:
- You must have an Auth0 account
- You should know the value of your
proxy.hostsetting in your Helmvalues.yamlfile
How to Enable Auth0 as an IdP #
The following guide does not cover how to create user pools in Auth0; once initially configured, any user with a Gmail account can log in to your HPE ML Data Management instance. Refer to the official Auth0 documentation on how to manage users.
1. Create an App on Auth0 #
- Log in to your Auth0 account.
- In Applications, click Create Application.
- Type the name of your application, such as HPE ML Data Management.
- In the application type, select Regular Web Application.
- Click Create.
- Go to the application settings.
- Scroll down to Application URIs.
- In the Allowed Callback URLs, add the HPE ML Data Management callback link in the following format:
https://<your.proxy.host.value>/dex/callback
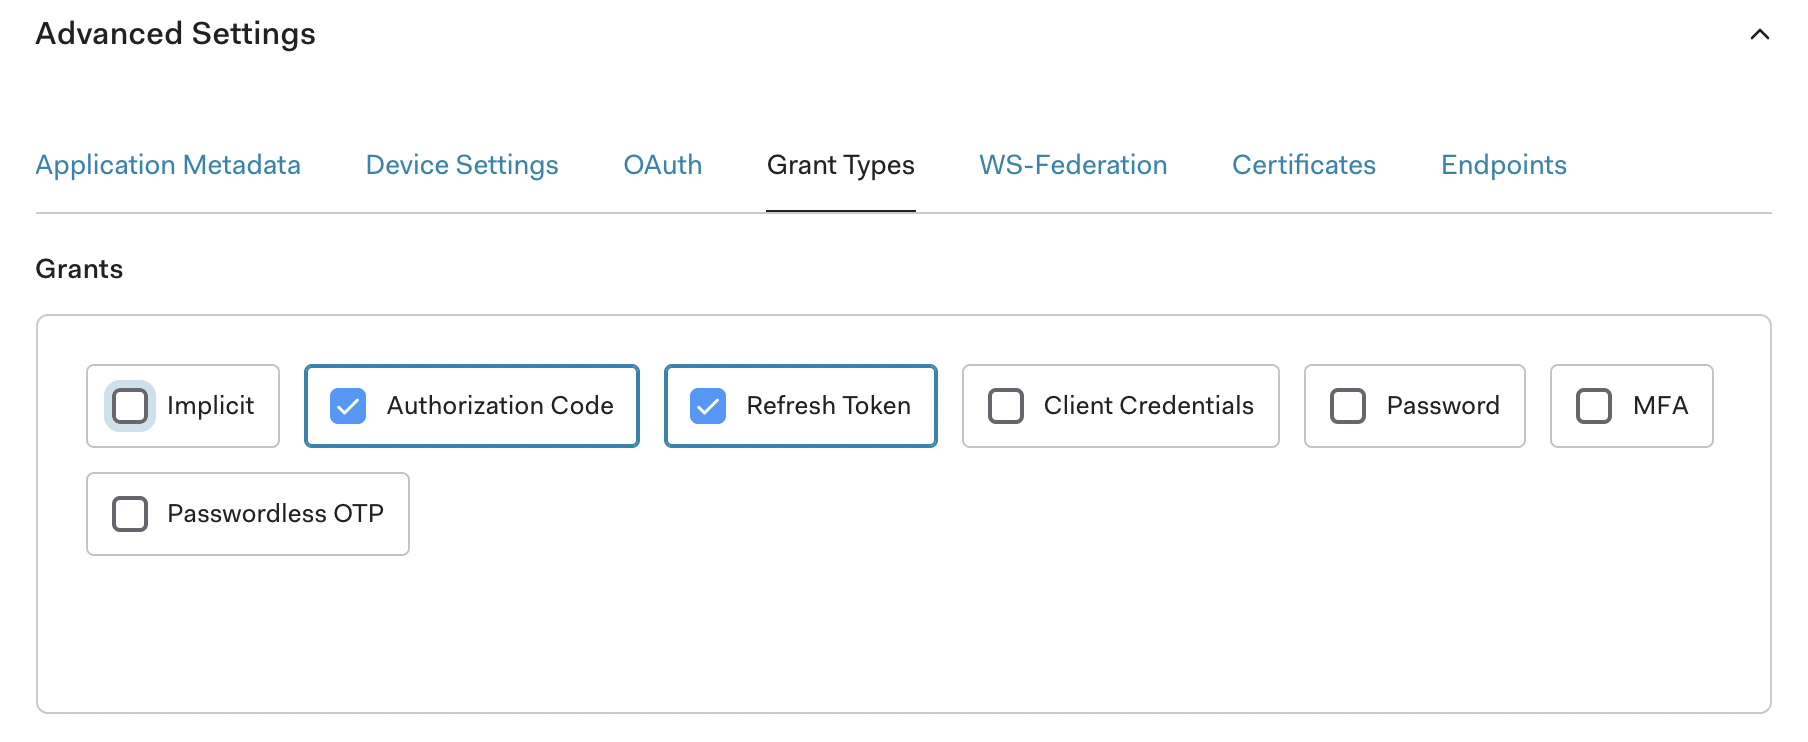
- Scroll down to Show Advanced Settings.
- Select Grant Types.
- Verify that Authorization Code and Refresh Token are selected.
2. Define Helm Config #
The following steps add the OIDC section to your Helm chart. When an upstream IdP is successfully added to the list, HPE ML Data Management’s default MockIdP is disabled automatically. You can add multiple IdPs to upstreamIDPs.
- Navigate to your
values.yamlfile or obtain your current Helmvalues.yamloverrides:helm get values pachyderm > values.yaml - Add the following section:
{
  "oidc": {
    "upstreamIDPs": [
      {
        "type": "oidc",
        "id": "auth0",
        "name": "Auth0",
        "config": {
          "issuer": "https://<auth0.app.domain.url>/",
          "clientID": "FbTzaVdABC9TbX07pXqxHwofuEOux004",
          "clientSecret": "1kbxtx22DLLMNOrjJgV-RaaUsmTzGoQ3h4UEeQ2hmduP1qPLK5yTOsrmwwVNXP9U",
          "redirectURI": "https://<proxy.host.value.com>/dex/callback",
          "insecureEnableGroups": true,
          "insecureSkipEmailVerified": true,
          "insecureSkipIssuerCallbackDomainCheck": false
        }
      }
    ]
  }
}oidc:
upstreamIDPs:
- type: oidc
id: auth0
name: Auth0
config:
issuer: https://<auth0.app.domain.url>/
clientID: FbTzaVdFCB9TbX07pXqxBwofuEOux004
clientSecret: 1kbxtx22DLGSULrjJgV-TaaUsmTzGoQ3h4UZeQ2hmduP1qPLK5yTOsrmwwVNXP9U
redirectURI: https://<proxy.host.value.com>/dex/callback
insecureEnableGroups: true
insecureSkipEmailVerified: true
insecureSkipIssuerCallbackDomainCheck: falseNote that HPE ML Data Management’s YAML format is a simplified version of Dex’s sample config.
- Update the following attributes:
| Field | Description |
|---|---|
issuer | The Auth0 App’s domain URL, found under Settings > Basic Information; must have https:// and a trailing slash /. |
clientID | The Auth0 App’s client ID, found under Settings > Basic Information. |
clientSecret | The Auth0 App’s client secret, found under Settings > Basic Information. |
redirectURI | A combination of your proxy host value and /dex/callback. For example, https://console.pachdemo.com/dex/callback. |
- Save your changes and upgrade your cluster:
helm upgrade pachyderm pachyderm/pachyderm -f values.yaml
Alternatively, you can create a secret containing your dex connectors (Key: upstream-idps) and reference its name in the field oidc.upstreamIDPsSecretName.
3. Login #
The users registered with your IdP are now ready to Log in to HPE ML Data Management
Troubleshooting #
PachD CrashLoopBackOff #
If you encounter a CrashLoopBackOff error after running the kubectl get pods command, it’s likely that one of the following needs to be fixed:
- your
issuervalue is incorrect (it must havehttps://and a trailing slash/). - you have an unexpected field such as
versionin the config sectionoidc.updstreamIDPs entry.
Example Error in PachD Pod logs #
You can obtain your pod logs by running: kubectl logs <pachd-pod-name> > logs.txt
create connector with ID: "auth0": unable to open connector: failed to get provider: oidc: issuer did not match the issuer returned by provider, expected "https://<auth0.app.domain.url>/" got "https://<auth0.app.domain.url>"